
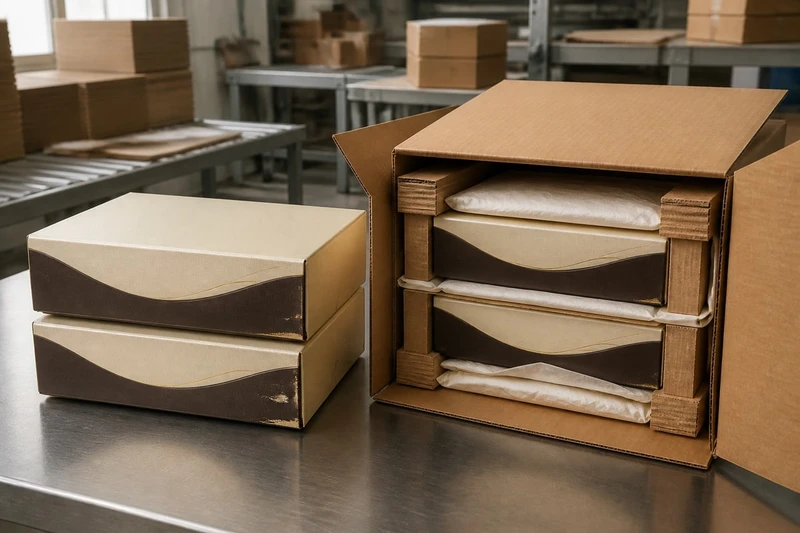
To prevent packaging scuffing and crushing, treat the finished box, internal protection, outer carton and pallet as one system. A durable coating alone will not stop abrasion if printed faces rub in transit, and a strong shipper carton cannot protect a box that has unsupported panels or excess empty space.
The most reliable approach is to identify where damage occurs, match the finish to the handling risk, reinforce vulnerable box areas, separate visible surfaces, control carton fill, and test the actual storage and delivery route before committing to volume production.
Identify the likely damage mechanisms
Scuffs and crushing look different, but they often arise from the same issue: uncontrolled movement or pressure during handling, storage and transport.
Start by inspecting damaged packs and recording exactly where marks and deformation occur. This helps distinguish between a surface-finish problem, a structural problem and a pack-out problem.
Common causes of scuffing
Scuffing is friction damage. It may appear as dull patches, scratches, rubbed ink, edge wear or colour transfer. Typical causes include:
- Finished boxes rubbing against each other inside an outer carton
- Movement caused by underfilled cartons
- Dust, paper fibres or grit trapped between printed surfaces
- Rough handling during manual packing, picking or replenishment
- Unprotected boxes sliding on pallets or conveyor surfaces
- High-gloss or dark printed panels contacting corrugated board
- Tight carton packing that creates excessive side pressure
Boxes with large dark ink areas, solid colours, metallic effects, foil details and gloss finishes tend to make minor rubbing more visible. A mark that is barely noticeable on uncoated kraft packaging can be highly apparent on a black, navy or deep-coloured gift box.
Common causes of crushing
Crushing occurs when a pack cannot resist compression, impact or bending. It often affects corners, lid edges, sidewalls, window areas and broad unsupported panels.
Likely causes include:
- Outer cartons stacked beyond their practical load-bearing ability
- Cartons with empty headspace that collapse when loaded
- Loose internal packs that shift and strike carton walls
- Boxes with weak corners, shallow folds or poorly supported lids
- Excess weight placed on delicate packs during warehousing
- Pallet overhang, unstable stacking or uneven load distribution
- Handling equipment applying concentrated pressure to carton edges
A valuable finished box can arrive with no puncture in the shipper carton yet still be creased or distorted. This usually means the internal pack-out did not distribute loads properly.
Map the damage before changing materials
Avoid changing board grade, coating and carton style all at once. First, map the problem:
- Photograph the damage on the finished box and outer carton.
- Note whether it is concentrated on faces, edges, corners, lids or windows.
- Check if the same defect appears at the top, middle or bottom of a pallet.
- Compare cartons that travelled well with those that did not.
- Ask whether damage appeared after manufacture, during storage, after fulfilment or on delivery.
- Review the number of handling touches, transfers and stacking stages.
This evidence points to the right corrective action. For example, consistent face scuffing between adjacent boxes calls for separation, while crushed lower cartons may require a revised pallet pattern, lower stack height or a stronger shipper carton.
Review coating and finish sensitivity
Surface finish affects both how packaging looks and how it survives contact. The right choice depends on the artwork, substrate, packing method and expected distribution conditions.
No finish is completely scratch-proof. The aim is to select a finish appropriate to the likely rubbing, stacking and handling exposure, then ensure the pack-out does not defeat that protection.
Compare finishes against handling risk
| Finish or treatment | Where it can suit | Main transit consideration |
|---|---|---|
| Uncoated stock | Natural, tactile or understated designs | Can show dirt, finger marks and abrasion; protect from dust and direct rubbing |
| Aqueous coating | General printed cartons and retail packs | Can improve surface protection, but performance varies with coverage, substrate and handling conditions |
| Matt lamination | Premium cartons, gift packaging and subdued designs | Can show burnishing or polishing where surfaces rub, particularly on dark colours |
| Gloss lamination | Colour-rich graphics and packs needing a shiny surface | May reveal scratches and can be prone to visible friction marks under pressure |
| Soft-touch lamination | Premium presentation packs | Often visually sensitive to rub marks, oils and concentrated pressure; separate surfaces carefully |
| Spot UV | Highlight areas and selective gloss effects | Raised or glossy areas can be vulnerable when packed face-to-face |
| Foil stamping or metallic effects | Luxury branding and decorative details | Requires protection from contact and edge abrasion, especially on prominent panels |
Coating terminology can vary between suppliers, and the actual result depends on ink coverage, curing, board type and production method. Confirm what coating is being applied, where it sits in the construction, and whether the proposed pack-out has been considered.
Design choices that reduce visible scuffs
You can reduce risk before the box reaches packing by considering the artwork and finish together.
Useful design decisions include:
- Avoiding large, uninterrupted dark panels where frequent handling is expected
- Keeping delicate foil or spot effects away from corners and high-contact edges where practical
- Using texture, pattern or a lighter visual field to make minor abrasion less conspicuous
- Reserving premium, sensitive finishes for external gift boxes that will receive individual protection
- Choosing finishes after reviewing whether boxes will be nested, flat-packed, hand-packed or mechanically packed
Do not assume a heavier coating will solve movement within the carton. Where boxes repeatedly rub during transport, spacing and restraint are usually more effective than relying on a finish alone.
Watch for finish-to-finish contact
Some combinations are particularly prone to marking when pressed together for long periods, especially in warm conditions or under stacked loads. Examples can include matt-to-gloss contact, soft-touch surfaces pressed together, and freshly finished print packed before it has stabilised.
For sensitive premium packs, specify the contact surfaces and protection method as part of the packing instructions. A simple line such as “do not pack printed front panels face-to-face without an interleaf” can prevent inconsistent decisions on the packing floor.
Strengthen corners, panels and inserts
Structural reinforcement keeps the finished package in shape and prevents external forces from reaching the product or presentation surfaces.
The most effective reinforcement is targeted. Adding material everywhere can raise cost, weight and carton volume without solving the actual weak point.
Reinforce the areas that fail first
Corners and broad panels should be assessed separately.
Corners and edges need attention when boxes are dropped, stacked, picked frequently or packed tightly. Consider:
- Properly formed lock tabs and glued seams
- Corner supports on rigid set-up boxes
- Fold geometry that resists opening or buckling
- Outer cartons sized to prevent direct impacts against box corners
- Edge protection where packed products have hard or sharp internal components
Large panels and lids need support when they bow, crease or dent under top load. Options may include:
- A more suitable board construction for the box format
- Internal trays that support the sidewalls
- Inserts that brace the lid or keep products from pressing outward
- Reduced carton stacking height
- A closer-fitting shipper carton that controls movement
The correct construction depends on box dimensions, product mass, how the box is oriented in transit and whether it will be stacked. Confirm these inputs before selecting board thickness or insert design.
Use inserts for both product protection and box support
An insert should do more than hold a product in position. It can also transfer load away from decorative panels and prevent the product from becoming a battering ram inside the box.
Depending on the product, suitable options may include:
- Paperboard dividers for separating multiple items
- Folded card inserts that support sidewalls
- Pulp, foam or formed inserts where product geometry needs close restraint
- Trays that lift the product clear of the lid and base
- Collars or frames that create a protective zone around fragile contents
An insert that is too loose permits movement; one that is too tight can bow the box or mark the product. Test the assembled pack, not the insert by itself.
For product launches, retail presentation and premium unboxing, explore custom packaging boxes with the product dimensions, product weight and distribution method considered together.
Do not overlook the closure
A lid that opens under pressure, a tuck flap that catches, or a magnetic closure that allows sidewall flex can create secondary damage. Confirm that the closed pack remains square and that the closure does not concentrate pressure on printed edges when cartons are stacked.
Separate finished surfaces in the carton
The simplest way to reduce scuffing is to stop decorated surfaces from touching and moving against each other.
Direct box-to-box contact is often acceptable for robust, low-risk packaging. It is less suitable for gift packaging, dark printed packs, laminated surfaces, foil, soft-touch finishes and high-value retail boxes.
Choose the right separation method
| Separation option | Best used when | Limitation to check |
|---|---|---|
| Paper interleaves | Flat panels or boxes packed in layers | Must remain in place and not add excessive packing time |
| Tissue or glassine-style sheets | Premium finished surfaces and light abrasion control | May not prevent crushing or movement on its own |
| Cardboard dividers | Packs need individual cells or side separation | Uses carton volume and needs accurate sizing |
| Corrugated partitions | Heavier items or higher impact risk | Can be too abrasive if decorative faces touch it directly |
| Individual sleeves or bags | Premium or highly scuff-sensitive boxes | Adds packing materials and can slow fulfilment |
| Inner cartons | High-value packs needing a second level of containment | Adds cost, volume and more material to manage |
The protective material must be compatible with the surface it contacts. For instance, rough corrugated material may protect against impact yet cause rub marks on an exposed decorative face if the pack can move.
Pack orientation matters
Place boxes so their strongest surfaces carry the load, while their most decorative surfaces are shielded. If a front panel carries foil or a soft-touch finish, do not make it the primary load-bearing contact face within a carton.
Also consider whether boxes are packed upright, on edge or flat. A pack that is strong when upright may crush if laid flat with a large unsupported lid facing the carton top.
Prevent movement, not just contact
Interleaves reduce surface-to-surface rubbing, but they cannot prevent impact if products can shift across an underfilled carton. After adding separators, check for:
- Side-to-side movement
- Vertical lift or rattling
- Empty corners
- Packs leaning into one another
- Contents settling after vibration
Use void fill or carton resizing where needed, but avoid forcing material into the carton so tightly that it presses into the finished packaging.
Control carton fill and pallet arrangement
A shipper carton works best when it is filled consistently, supports its contents and has enough strength for the planned stack. Overfilled and underfilled cartons both create damage risks.
Set a practical carton fill level
An underfilled carton allows packs to collide. An overfilled carton creates pressure on box corners and can distort its own walls. The target is a stable, square carton in which contents are restrained without being compressed.
Check that:
- The carton closes without bulging
- There is no substantial void above the products
- Contents do not shift when the carton is gently tilted
- Void fill supports rather than crushes the packs
- Heavy products are not resting on fragile lids or decorative faces
- Carton dimensions suit the final pack, including dividers and interleaves
Do not use a large general-purpose carton merely because it is available. A correctly sized carton can reduce movement, packing material and handling damage.
Build stable pallet loads
Pallet damage often starts with poor load geometry rather than a problem in the individual carton. Arrange cartons so the load is stable from the base upward.
Good practice includes:
- Keeping cartons within the pallet footprint to avoid unsupported edges
- Putting heavier, more compression-resistant cartons lower in the stack
- Avoiding uneven columns and large gaps between cartons
- Keeping carton orientation consistent where compression strength differs by direction
- Using appropriate load restraint so cartons cannot shift during transport
- Avoiding excessive load height where lower cartons show compression damage
Pallet wrap, straps and corner protection can stabilise a load, but overtight restraint may crush light cartons. Test restraint tension using the actual carton and stack configuration.
Account for Australia’s distribution conditions
Long distances, multiple handling points, warehouse dwell time and variable temperatures can increase exposure to vibration, stacked loads and surface rubbing. This does not mean every pack requires heavy-duty protection; it means the pack-out should reflect the actual route rather than an idealised single delivery.
A retail-ready gift box travelling in a master carton through several distribution stages generally needs more surface separation than a sturdy brown shipping box dispatched directly to a customer.
Trial the real pack-out and handling route
The final proof is a realistic trial using production-representative boxes, finishes, inserts, outer cartons and pallet arrangement. A pristine sample box on a desk does not show how the complete system behaves under handling.
What to include in a practical trial
Replicate the conditions the pack is most likely to experience:
- Assemble the finished package with the intended product or representative weight.
- Pack the proposed quantity into the final shipper carton.
- Include actual dividers, interleaves, sleeves, tape and void fill.
- Stack cartons in the intended pallet pattern and orientation.
- Check the load after storage, manual handling and a representative delivery movement.
- Inspect boxes at the top, middle and bottom of the stack.
- Record scuffs, edge wear, panel bowing, corner crushing and movement inside cartons.
If the route includes e-commerce fulfilment, test the order quantity customers actually receive. A shipper designed for twelve retail boxes may not protect one gift box sent individually.
Change one variable at a time
When a pack fails, modify the most likely cause first. Useful trial changes might include:
- Adding an interleaf between printed faces
- Reducing the number of boxes per carton
- Changing box orientation
- Adding a divider or insert brace
- Reducing void space
- Adjusting pallet stacking pattern
- Selecting a finish better suited to the contact risk
Changing several elements simultaneously makes it difficult to know which decision improved the result and can lead to unnecessary material costs.
Include the people who handle the pack
Packaging designers, procurement teams, warehouse staff and fulfilment partners often see different parts of the problem. Give pack-out instructions that are simple enough to follow consistently, including carton quantity, orientation, divider placement, void-fill requirement and pallet pattern.
This is especially important for custom gift packaging, where the external presentation may be as important as the product protection.
Common mistakes that cause avoidable damage
Avoid these frequent errors when trying to prevent packaging scuffing and crushing:
- Selecting a premium finish without specifying how finished surfaces will be separated
- Increasing board thickness when the real issue is excess space inside the carton
- Packing decorative faces against rough corrugated dividers
- Filling cartons tightly enough to pressure-mark corners and lids
- Using loose void fill that settles during transport
- Assuming a pallet wrap can compensate for unstable carton stacking
- Testing a single box rather than a full, stacked shipment
- Assessing only obvious crushing and overlooking light scuffs that reduce shelf appeal
Final checklist before approving production
Before approving a packaging specification, confirm:
- Which panels, finishes and decorative details are most scuff-sensitive
- Which corners, folds and panels carry stacking loads
- How the product is restrained inside the finished box
- Whether boxes touch each other inside the shipper carton
- The carton quantity, orientation and void-fill approach
- The proposed pallet footprint, stack height and restraint method
- Whether the system has been trialled in a realistic pack-out configuration
- Who owns and follows the documented packing instructions
Reducing damage is rarely about one “stronger” material. It comes from making the finish, box structure, internal protection, carton sizing and pallet arrangement work together. When specifying a new pack, begin with the product and handling route, then test the complete assembled system before finalising the order.
