
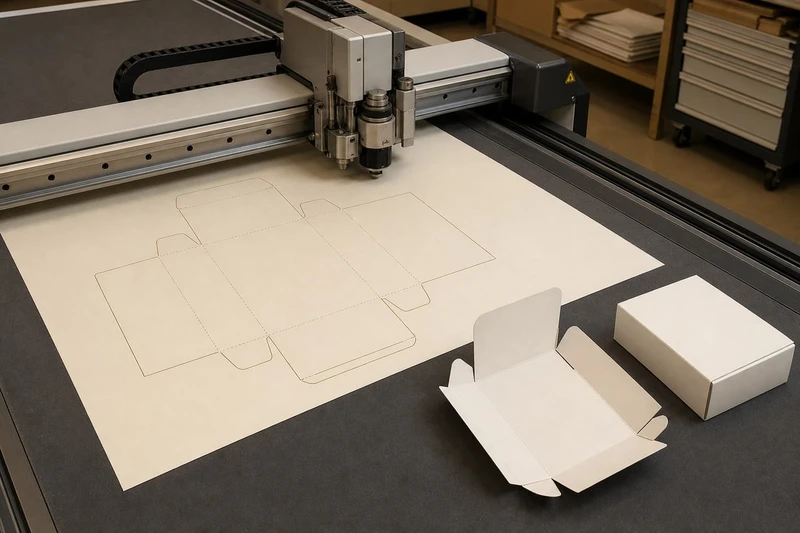
A packaging dieline is the flat technical layout used to manufacture a box, sleeve, label or other printed pack. It shows where the material will be cut, creased, folded, glued and sometimes where windows or special finishes will sit. Your artwork is placed on this flat layout before the package is made into its final three-dimensional form.
For brand and artwork teams, the practical rule is simple: use the printer-supplied dieline at its original scale, keep the dieline on a separate non-printing layer, and check every panel as it will appear after folding. A visually attractive flat file can still produce an upside-down logo, clipped copy or unusable barcode if the dieline is misunderstood.
Understand cut, crease and fold lines
A dieline contains production guides. These guides should not print on the finished package unless your packaging supplier specifically asks for them to be included.
The line colours, names and styles can differ between suppliers, so always use the key supplied with the file rather than relying only on convention. The most common elements are below.
| Dieline element | What it means | Artwork implication |
|---|---|---|
| Cut line | The outer edge or internal shape that will be cut away | Extend backgrounds and images beyond it into the bleed area |
| Crease or score line | A pressed line that helps board fold cleanly | Keep small type, logos and fine borders clear of it |
| Fold line | A guide showing where a panel changes direction | Check the orientation of text and graphics on adjoining panels |
| Perforation | A row of small cuts for tear-off sections or opening features | Avoid tiny text or critical visual elements over the line |
| Glue flap or glue zone | An area used to assemble the pack | Do not place essential artwork there unless agreed with the printer |
| Window cut-out | An opening that exposes the product or an inserted film | Keep key information clear and allow for the opening shape |
| Registration or production mark | A printing or finishing reference mark | Usually remains outside the finished pack and must not be moved |
Keep production guides separate from print artwork
Set up your document with distinct, clearly named layers. A useful layer order is:
- Dieline / production guides — locked and set to non-printing where instructed.
- Finishing guides — such as foil, emboss, spot UV or white ink, if applicable.
- Print artwork — imagery, colours, text and logos.
- Notes layer — only if the supplier accepts production notes in the file.
Never redraw, scale, rotate or alter a dieline merely to make it fit an existing artwork file. Even small changes may affect panel sizes, glue tolerances, inserts and cutting tools. If a new size or structure is needed, request a revised dieline.
Do not assume all lines mean the same thing
Some templates use solid magenta for cutting and dashed cyan for creasing; others use spot colours with names such as CUT, CREASE, PERF or GLUE. A line’s appearance is less important than its assigned spot colour, overprint setting and layer instructions.
Before starting design, ask for clarification if the dieline does not identify:
- finished dimensions;
- board or material type;
- bleed requirement;
- safe-area recommendation;
- glue areas;
- finishing masks;
- which guide layers should be non-printing.
Map panels and orientation
A carton is designed flat but experienced upright. Mapping panels before adding artwork prevents common errors such as a back panel becoming the front, or text reading upside down after a flap is folded.
Start by making a simple panel map. Identify the front, back, left and right sides, top and base, plus every flap. If the pack has an opening tab, tuck flap, hang tab or display panel, label these as well.
Use a physical mock-up
The quickest orientation check is a low-cost paper dummy:
- Print the dieline at 100% on ordinary paper.
- Cut around the cut line.
- Fold on the crease lines.
- Use removable tape on the glue flap.
- Write panel names directly on the mock-up.
This reveals how the product will be handled, where the opening is located and which panels remain visible on shelf or in an e-commerce unboxing. It is particularly useful for reverse tuck-end cartons, sleeves, gift boxes and multi-panel packaging.
Decide what belongs on each panel
The front panel usually carries the primary brand signal: product name, variant, key visual and the most important shopper-facing message. The remaining panels can accommodate mandatory information, instructions, ingredients or materials information, barcode, contact details and secondary claims.
However, the “front” is not always the largest panel. For a hanging product, the face shown at eye level may be different from the panel that appears front-facing in a flat diagram. For retail packs, consider how the item will sit, stack or hang before locking the layout.
A panel map should answer these questions:
- Which surface faces the customer first?
- Is the logo upright when the box is standing as intended?
- Does the opening flap show any text or graphics in the correct direction?
- Does a design continue across a fold in a deliberate way?
- Will an image look natural when it wraps around corners?
- Are important details visible without turning the package?
Treat panel joins with care
A background can continue across folds, but avoid placing precise visual details directly on a crease. Fine rules, faces, small icons and text can look interrupted or distorted where the board bends.
Also avoid using thin borders that run close to the cut edge of every panel. Minor production movement is normal, so a border can appear uneven once the carton is cut and formed. A wider border or a deliberately irregular graphic treatment is more forgiving.
Set bleed and safe areas
Bleed and safe area solve two different problems. Bleed makes sure the background reaches the edge after cutting. A safe area protects important artwork from normal variation in cutting, creasing and folding.
Bleed extends beyond the cut line
If a colour, photograph or graphic is intended to print to the finished edge, it must extend beyond the cut line. This extra printed margin is called bleed.
For many printed packaging projects, a 3 mm bleed is a common starting point, but it is not universal. Packaging structure, material, print process and finishing requirements can change the amount needed. Use the requirement on the approved dieline or confirm it with the supplier before finalising artwork.
Do not add a white border around edge-to-edge graphics unless that border is an intentional part of the design. A white border caused by insufficient bleed is a setup error, not a design feature.
Safe areas sit inside the finished edge
Keep essential content inside the safe area: product names, legal text, barcodes, logos, QR codes, fine icons and key claims. A safe area is typically inset from cut and crease lines, but its exact distance should come from the supplied template.
As a practical visual rule, give critical elements more room than decorative backgrounds. The closer something sits to a cut, fold or glue boundary, the greater the risk that it will look crowded, be clipped or become hard to read after assembly.
Check these high-risk artwork features
Pay additional attention to:
- Small type: Text may be technically inside the trim line but still too close to a fold to remain comfortable to read.
- Reversed type: White or light text on a dark background can lose clarity if it is very small or uses a thin font weight.
- Fine lines: Hairline rules can vary in appearance depending on print method, board texture and colour build.
- Large areas of solid colour: These can make scuffs, board cracking at folds or colour variation more noticeable.
- Photographic faces and products: Keep focal points away from creases and cut-outs.
- Borders and frames: Ensure they are generous enough to tolerate normal cutting movement.
For labels, the same principles apply, but the usable area may also be affected by the container shape, label application position and curved surfaces. A custom printed sticker needs enough clear space around important information to remain readable once applied.
Handle windows, glue zones and finishes
Windows, glue zones and decorative finishes make packaging more functional and distinctive, but they add artwork constraints. Treat each one as a separate production requirement rather than a visual afterthought.
Windows and transparent film
A die-cut window removes part of the board to reveal the product or a clear film behind it. The window may be an open cut-out, or it may be backed by a transparent plastic film fixed inside the carton.
For windowed packs:
- Do not put mandatory copy, barcodes or essential imagery where the board will be removed.
- Keep a sensible buffer around the window edge, especially for small type.
- Consider what the customer will see through the opening when the product is packed.
- Confirm whether the window film needs an adhesive margin that reduces the visible opening.
- Check whether the window affects the strength of a narrow panel or flap.
A window can alter the apparent colour of nearby artwork because product colour, shadows and reflections become part of the presentation. View a mock-up with the intended product wherever possible.
Glue zones and overlap panels
Glue areas are usually hidden inside the finished carton, but not always. Some structures have visible seams, overlapping sleeves or external tabs. Follow the supplier’s glue-zone markings precisely.
Do not place key wording, a product image or a scannable code under a glue flap. Adhesive can affect ink appearance, and folded board may conceal or distort the content. If artwork must continue through the area, confirm whether the printer requires a no-print zone, ink-free strip or special adhesive compatibility.
Foil, embossing, debossing and spot UV
Special finishes often require separate vector masks. These masks indicate where the foil, raised emboss, recessed deboss or spot UV will be applied. They are not simply another colour in the main artwork.
Common setup requirements include:
- Create the finish as a named spot colour, following the supplier’s naming convention.
- Use solid vector shapes rather than raster effects unless specifically approved.
- Set the mask to overprint when instructed.
- Avoid very fine detail, tiny isolated dots and narrow gaps that may not reproduce cleanly.
- Allow for registration tolerance between printed artwork and the finishing pass.
- Keep embossing and debossing clear of deep creases, cut edges and glue zones.
A foil outline around small text, for example, may look sharp on screen but be difficult to register accurately on a textured board. Ask for minimum line widths, minimum gaps and trapping guidance for the chosen finish.
Consider material before finalising the look
The same file can look markedly different on uncoated board, coated board, kraft-style stock, metallic material or corrugated packaging. Ink absorption, surface texture, fold behaviour and the visibility of fine detail all vary.
When selecting custom packaging boxes, provide the intended material, structural style, finish and packing use early. It allows the dieline and artwork rules to be matched to the actual pack rather than an assumed one.
Check barcodes and required information
A barcode that scans on a computer monitor is not necessarily reliable when printed on packaging. Its final performance depends on size, contrast, quiet zones, printing method, surface, finish, curvature and damage during handling.
Place barcodes for scanning, not just for convenience
For retail product barcodes, use the authorised barcode number and artwork supplied or approved by the relevant product owner or barcode provider. In Australia, businesses commonly work with GS1 standards for retail identification; confirm the required format and placement with your retailer, marketplace or barcode administrator.
Use these barcode checks:
- Keep the barcode at its required size; do not compress, stretch or redraw it.
- Preserve the clear space around it, known as the quiet zone.
- Use strong contrast, usually dark bars on a light, non-reflective background.
- Avoid placing it across folds, seams, perforations, windows or heavily textured areas.
- Do not cover it with gloss effects, foil or a design element unless its scan performance has been checked.
- Keep it accessible on the assembled pack, not hidden on an internal flap.
- Test a physical production sample with an appropriate scanner if retail scanning is important.
QR codes need similar care. Maintain their clear margin, do not use a low-resolution image, and test the final printed code on the actual material. If it links to time-sensitive content, confirm that the destination is live before approval.
Build a required-information checklist
Packaging information requirements vary widely by product category, sales channel and claim. Food, cosmetics, therapeutic goods, electrical products and children’s items can have different obligations. This article is general artwork guidance, not regulatory advice.
Before approval, ask the responsible compliance, legal or product team to review the current requirements for your product and sales market. Common content categories include:
- product name and variant;
- net quantity or pack count;
- ingredients, materials or composition details;
- directions for use, care or assembly;
- warnings and safety information;
- batch, lot, date or traceability fields where applicable;
- supplier identity and contact details;
- country-of-origin statements where required;
- recycling, disposal or material information;
- required symbols, marks or retailer-specific data.
Leave sufficient space for variable data if batch coding, date coding or overprinting will occur later. A code area needs appropriate contrast, a suitable surface and a location that remains visible after packing.
Run a preflight before approval
Preflight is the final systematic check of artwork before it is released for production. It should happen before approving a proof, not after discovering an error in finished stock.
A PDF that opens correctly is not automatically production-ready. Preflight checks the technical file, while a folded mock-up and proof check how the design works in the real world.
Artwork preflight checklist
Use this checklist for every packaging job:
- [ ] The correct, current dieline is used at 100% scale.
- [ ] Cut, crease, perforation and glue guides are intact and on the correct layer.
- [ ] Dieline and technical lines are set not to print, unless instructed otherwise.
- [ ] All backgrounds extending to an edge include the specified bleed.
- [ ] Essential content sits inside the recommended safe area.
- [ ] Text is converted or fonts are embedded according to the supplier’s file requirements.
- [ ] Images have suitable effective resolution at final print size.
- [ ] Colours use the requested colour mode and any required spot colours are correctly named.
- [ ] Black text and rich black backgrounds are built according to the printer’s guidance.
- [ ] Overprint settings have been checked, particularly for black text, white objects and finish masks.
- [ ] Transparencies, clipping masks and effects are flattened or preserved in the required PDF standard.
- [ ] Barcodes and QR codes retain adequate size, contrast and clear space.
- [ ] Mandatory content has been reviewed by the appropriate internal stakeholder.
- [ ] Window, glue, foil, embossing and spot-UV areas are supplied as instructed.
- [ ] The flat artwork has been checked against a folded paper dummy or 3D proof.
- [ ] The exported PDF has been reopened and visually inspected.
Review the proof in context
A digital proof is useful for spelling, layout and panel orientation, but screen colour is not a final colour reference. A hard proof or production sample may be more suitable where brand colour, finish appearance or barcode performance is critical. Confirm what type of proof is being supplied and what it can realistically validate.
Also check the proof at 100% size. Zooming in on screen can make tiny copy appear more legible than it will be on a physical carton. Print a full-size office copy for a quick readability check, while recognising that an office printer does not predict final production colour or finish.
Common approval mistakes
The most avoidable dieline errors are usually procedural:
- approving an old dieline after the box structure has changed;
- designing to the visible panel edge instead of the cut and safe areas;
- moving technical layers to make the artwork look tidier;
- treating glue flaps as ordinary printable panels;
- forgetting that top and base flaps may be read in different orientations;
- supplying finishing artwork without a separate mask;
- placing the barcode on a fold or glossy, low-contrast background;
- approving copy before legal or product information is final;
- relying only on a flat PDF rather than folding a mock-up.
FAQ
Can I create my own packaging dieline?
You can create a concept layout, but a production dieline should be supplied or approved by the packaging manufacturer. Structural details such as board thickness, fold allowances, glue flap dimensions and cutting tolerances affect whether a box forms correctly.
What file format is best for packaging artwork?
A press-ready PDF is commonly requested, often exported from Adobe Illustrator, InDesign or similar professional layout software. Requirements differ, so confirm the required PDF preset, colour settings, bleed and whether editable source files are also needed.
Should the dieline be visible in my final PDF?
Usually, yes, if the supplier requests it for checking, but it should be on a separate non-printing layer or use the designated technical spot colours. Never assume it will be removed automatically; follow the supplied artwork specification.
How much bleed do packaging dielines need?
Three millimetres is common for many packaging applications, but the correct allowance depends on the specific structure and production method. Always follow the supplied dieline or written instruction.
A well-prepared dieline turns artwork approval from a guess into a controlled handover. Map the panels, protect critical content with bleed and safe areas, respect technical zones, and check a full-size folded dummy before signing off. If you are preparing a new custom box, request the production dieline and artwork specification before design begins.
