
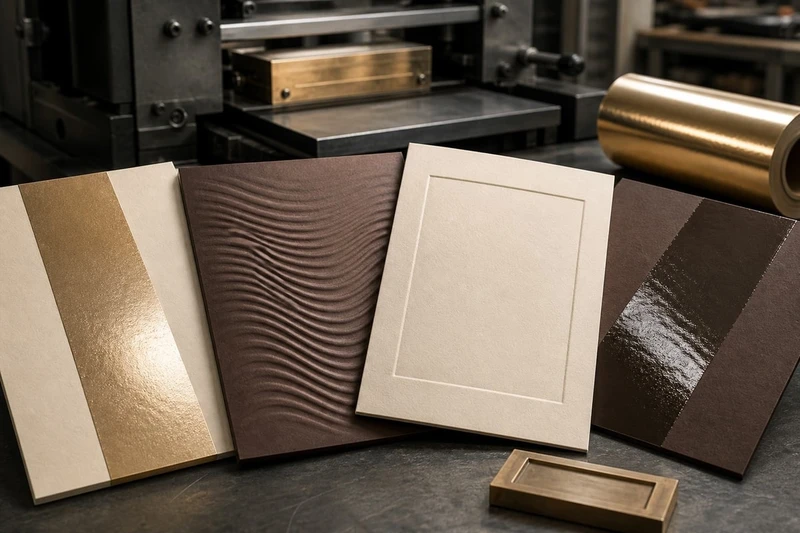
Choosing between foil, embossing, debossing and spot UV comes down to the effect you need people to notice first: metallic shine, raised detail, pressed-in texture or selective gloss. For many premium boxes, foil embossing creates the strongest “look and feel” moment, while spot UV is often the more practical choice for adding contrast to printed artwork.
A useful foil embossing spot UV comparison should consider more than appearance. The stock, laminate, artwork detail, coverage area, tooling and registration tolerance all affect whether a finish looks refined or overly busy. The best option is usually the one that supports your brand hierarchy rather than decorating every available surface.
| Finish | Primary visual effect | Tactile result | Best suited to | Main production consideration |
|---|---|---|---|---|
| Foil stamping | Metallic, coloured or holographic shine | Usually smooth unless combined with embossing | Logos, borders, names and small hero elements | Requires accurate registration and foil tooling |
| Foil embossing | Reflective foil with dimensional highlights | Raised | Premium logos, monograms, short headlines and icons | Fine details and large solid areas need careful testing |
| Embossing | Light-and-shadow definition without metallic colour | Raised | Subtle branding, patterns, seals and textured marks | The reverse side is normally visible as a recess |
| Debossing | Pressed-in, understated definition | Recessed | Minimal branding, natural stocks and tactile luxury packaging | Deep impressions can distort thin stock or small type |
| Spot UV | Localised gloss contrast | Smooth to slightly raised, depending on process | Patterns, photos, product names and graphic highlights | Best contrast is usually achieved against a matte surface |
Compare the visual and tactile result
Each finish signals quality in a different way. Consider what the customer will see at arm’s length, then what they will feel when picking up the pack.
Foil stamping: reflective and attention-grabbing
Foil stamping applies a thin metallic or pigmented foil to selected parts of the design using heat, pressure and a die. Gold and silver remain popular, but coloured, pearl and holographic foils can also suit specific brand identities.
Foil has a strong visual response to light. It is particularly effective when used for a brand name, emblem, narrow border or a short product descriptor. On a shelf or in an unboxing video, it can make a focal element stand out without needing more ink coverage.
Standard foil stamping is generally flat. If the design needs a tactile lift as well as shine, specify foil embossing rather than assuming every foiled detail will be raised.
Best visual use: a restrained metallic accent that guides the eye to the brand or product tier.
Potential drawback: broad foil areas can show texture, minor registration variation or handling marks more readily than small, well-defined elements.
Foil embossing: shine with dimension
Foil embossing combines metallic foil with a raised image. It gives the strongest tactile result among the common premium finishes because the raised form catches both light and fingertips.
This effect works well for:
- A central logo on a gift box
- A monogram or crest
- A short product name
- A seal, medallion or icon
- A simple pattern used sparingly across a lid
The raised edges produce highlights and shadows that make the foil look more dimensional than flat stamping. For high-end gift packaging, cosmetics, beverages and limited-edition presentation boxes, this can create a deliberate sense of craft and value.
However, foil embossing needs uncomplicated artwork. Thin type, tightly packed letterforms, tiny gaps and highly detailed illustrations may lose definition. It also has a practical cost implication: custom tooling is usually required, so it is better suited to a stable design than a temporary campaign where artwork may change frequently.
Embossing: premium texture without metallic shine
Embossing presses an image upward from the surface of the board or paper. Unlike foil embossing, it relies on shape, light and shadow rather than reflectivity. A blind emboss has no ink or foil applied, making it one of the most subtle premium effects available.
It suits brands that want a quiet, tactile finish, especially on uncoated, textured or natural-coloured materials. A blind embossed logo can feel more considered than a large printed mark because it rewards close inspection.
Keep in mind that embossing normally creates a corresponding depression on the reverse side. That may not matter on a single-panel lid, but it should be planned where the inside of the packaging will remain visible.
Debossing: recessed and understated
Debossing presses the design into the substrate, leaving an indented mark. It is often chosen for minimal, heritage-inspired or craft-focused branding. The tactile cue is immediate but subtle: fingers move into the impression rather than across a raised area.
Debossing can work particularly well with thicker uncoated board, paper wraps and simple logos. It is less visually dramatic than foil or spot UV, which is exactly why it suits understated packaging.
A deep deboss may weaken, crease or visibly distort lightweight stock. It can also make fine elements look soft or crowded. A simpler mark, generous spacing and a suitable board thickness give more reliable results.
Spot UV: selective gloss and graphic contrast
Spot UV is a clear coating applied only to nominated areas. It creates a gloss contrast against the surrounding print, especially when paired with a matte or soft-touch laminate. Depending on the process and coverage, it may feel almost flat or have a slight raised texture.
It is often a strong choice when the design already contains detailed printed graphics. A gloss layer can highlight a logo, photograph, pattern, product silhouette or key wording while retaining colour flexibility underneath.
Unlike foil, spot UV does not create a metallic reflection. Unlike embossing, it does not rely on a deep physical shape. Its value comes from controlled contrast: glossy against matte, smooth against soft-touch, or an illustrated motif against a quiet background.
Best visual use: large enough graphic shapes, patterns or type that benefit from gloss contrast.
Potential drawback: low contrast can make spot UV hard to see on a fully gloss surface, while excessive coverage may look patchy or show fingerprints.
Match each finish to suitable artwork
Premium finishing should be planned during artwork development, not added as a last-minute decoration. Each technique has limits around line weight, type size, spacing and the amount of detail it can reproduce.
Use simple, high-contrast shapes for foil and relief
Foil, embossing and debossing perform best with clean vector artwork. Logos, icons and lettering should have enough stroke width and separation for the die to form clear edges.
As general design guidance:
- Avoid hairline rules and very small reversed gaps.
- Give separate foil or relief elements enough space so they do not fill in visually.
- Use a bolder version of delicate typography where possible.
- Simplify detailed line illustrations before applying a dimensional finish.
- Keep important elements away from folds, scores, panel edges and corners.
- Do not rely on a metallic foil effect to reproduce fine tonal shading.
If a logo has intricate internal detail, it may be better to foil only the symbol or wordmark rather than the full lock-up. Another option is to print the detailed version and use embossing or foil on one simplified feature.
Use spot UV for patterns and printed detail
Spot UV can follow more complex shapes than an embossing die, but it is still not a replacement for fine photographic detail. It performs well on:
- Repeating geometric patterns
- Larger lettering
- Product outlines
- Decorative botanical or abstract motifs
- Selected areas of an illustration
- A logo printed in colour beneath a gloss coating
The spot UV artwork should be supplied as a separate, clearly named layer or spot colour in the production file. It must not be built as a screen effect within the standard CMYK artwork. Confirm the printer’s preferred naming convention, overprint setting and minimum practical detail before final export.
Build a clear finish hierarchy
A common mistake is assigning a premium effect to every element: foiled logo, embossed tagline, spot UV pattern, metallic border and textured background. Individually, these can all be attractive. Together, they can compete for attention.
Before selecting a finish, identify:
- The hero element — usually the brand name, logo or product name.
- The supporting message — product type, fragrance, flavour, collection or key descriptor.
- The background role — quiet, textured, patterned or illustrative.
- The first viewing distance — shelf, online product image, gift presentation or close handling.
Put the most tactile or reflective finish on the hero element. Let the remaining artwork support it through print colour, negative space or a more restrained effect.
Review paper and lamination interaction
The same finish can look markedly different on coated artboard, uncoated paper, coloured stock or laminated packaging. Always choose the substrate and surface treatment before approving the finishing method.
Uncoated and textured papers
Uncoated papers often enhance blind embossing and debossing because the material’s natural fibres and texture complement the tactile impression. They can also give foil a warmer, more crafted appearance.
The trade-off is that uneven or heavily textured surfaces may reduce the crispness of fine foiled details and make very small type less consistent. Textured stocks need a physical trial for anything intricate.
Coated board
Smooth coated board offers a more even surface for fine foil lines, sharp spot UV edges and detailed printed artwork. It is a versatile choice where the design depends on precision and clean contrast.
Embossing and debossing are still possible, but the visible dimensional effect can be influenced by board thickness, coating and print coverage. Dense printed areas may also show stress around a deep relief feature.
Matte and soft-touch lamination
Matte lamination gives spot UV one of its clearest visual advantages. The contrast between a low-sheen base and a high-gloss spot finish can make patterns and logos highly visible without adding another colour.
Soft-touch lamination can make packaging feel velvety, and spot UV or foil can create a striking material contrast. However, soft-touch surfaces can be more prone to scuffing, fingerprints or marking depending on handling and product use. Check how the chosen finish behaves through packing, transport and retail handling.
Foil on laminated surfaces can look excellent, but adhesion and edge definition should be tested on the actual laminate specified. Do not assume a foil that works on one matte film will behave identically on another.
Gloss lamination
Gloss lamination already reflects light, so standard spot UV may have limited visual contrast. It can still work for a subtle tonal effect, but it is less likely to deliver the immediate reveal seen on matte or soft-touch packaging.
Foil can remain visible on gloss laminate, although the combined reflectivity needs careful design. A highly reflective foil on a highly reflective background may make typography harder to read under certain lighting.
Coloured, recycled and dark stocks
Dark and coloured materials can make metallic foils look especially prominent. Gold, silver, copper and opaque pigment foils can provide strong contrast without large printed areas.
Recycled and natural stocks vary in fibre content, shade and surface texture. That variation can be part of the intended character, but it means a representative sample matters. Fine details may not reproduce as uniformly as they would on a smooth coated board.
For custom printed packaging boxes, ask for the intended board, print coverage, laminate and finish combination to be assessed together rather than as separate decisions.
Understand tooling, registration and coverage
The production method behind each finish affects cost, lead time, artwork setup and tolerances. Knowing the basics helps buyers compare quotes accurately and avoid avoidable revisions.
Tooling requirements
Traditional foil stamping, embossing and debossing use purpose-made tooling, commonly called dies. The die is produced from the approved artwork and is specific to the design, size and placement.
That means you should confirm:
- Whether tooling is included as a separate line item
- Whether a repeat order can use existing tooling
- What happens if the artwork, size or finish placement changes
- Whether foil stamping and embossing require separate or combined tooling
- Whether the proposed relief is practical for the chosen substrate
Spot UV commonly requires a screen or equivalent setup, depending on the production process. It may not involve the same type of metal die as embossing or foil, but it still needs accurate, final artwork and setup.
Registration and movement tolerance
Registration is the alignment between the finish layer and printed artwork. A small movement may be unnoticeable around a large spot UV pattern but obvious where foil follows a fine printed outline or sits inside narrow lettering.
To make registration more forgiving:
- Avoid creating a very thin printed keyline immediately around foil.
- Do not place foil on tiny type with a contrasting printed shadow.
- Build enough overlap where a spot UV feature sits over a printed shape.
- Keep critical finish elements away from folds and die-cut edges.
- Use simple, solid shapes instead of close-fitting multi-layer effects.
A finish can be technically within production tolerance and still look wrong if the artwork leaves no room for normal movement. Designing with tolerance in mind is essential.
Coverage area and practical trade-offs
Large coverage areas increase the chance of visible inconsistencies. Broad foiled blocks can show imperfections, while large embossed areas may distort board or create uneven relief. Heavy spot UV coverage may make the pack feel more plastic-like than intended and can highlight scratches or fingerprints.
As a practical rule, use foil and dimensional effects selectively. If a large visual field is needed, consider printing a metallic ink effect, using a coloured substrate, or applying the premium finish only to the focal region.
Small, meaningful coverage usually delivers a more premium outcome than maximum coverage.
Combine finishes without visual clutter
Combining finishes can work exceptionally well when each one has a distinct job. The aim is contrast, not competition.
Strong combinations
Foil embossing plus matte laminate A raised foil logo over a matte field creates clear visual and tactile hierarchy. This is a reliable option for premium gifting, beauty and commemorative packaging.
Blind embossing plus uncoated stock This combination relies on material quality and subtle shadow. It suits minimalist presentation where the packaging should feel considered without looking flashy.
Spot UV plus soft-touch or matte laminate Gloss patterns, a product name or a logo can stand out strongly against a low-sheen base. It is especially suitable for designs where printed colour or illustration remains the main feature.
Foil logo plus spot UV pattern This can work when foil is reserved for the brand mark and spot UV is used for a larger background motif. Keep the pattern quieter than the logo and avoid placing gloss directly beneath reflective foil unless the interaction is intentional.
Combinations to approach carefully
Avoid stacking multiple effects on the same small area unless a physical test proves the result. For example, foil over dense spot UV, very deep embossing over heavy ink coverage, or a tiny debossed and foiled serif typeface can create definition problems.
Also be cautious with several competing gloss levels. A gloss laminate, metallic ink, foil and spot UV may all reflect light differently, making the overall design harder to read.
A simple decision rule is useful: if you can identify the finish purpose for every element in one sentence, the hierarchy is likely clear. If not, remove or simplify one effect.
For presentation-led formats, explore structural choices and finishing together when specifying custom gift packaging. The lid style, opening experience and visible panel areas can influence which embellishment delivers the most value.
Approve samples on the chosen substrate
A digital artwork proof confirms content and layout, but it cannot reliably show the real behaviour of foil, embossing, debossing or spot UV. The final decision should be based on a physical sample made as closely as practical to the intended board, print, laminate and finish combination.
What to inspect in a physical sample
Review the sample under daylight and typical retail or indoor lighting. Then inspect it at normal viewing distance and close up.
Check:
- Colour and reflectivity: Does the foil suit the brand colours and remain readable in different light?
- Relief definition: Are embossed and debossed edges crisp enough? Does the depth feel deliberate?
- Registration: Is the finish aligned with printed artwork, borders and type?
- Legibility: Are small letters, thin lines and reversed details still clear?
- Surface quality: Are there scratches, scuffs, cracking, pinholes or unwanted texture changes?
- Lamination interaction: Does the foil or spot UV adhere cleanly to the selected surface?
- Handling: Does the finish show fingerprints or marking after normal handling?
- Structural impact: Do folds, scores, closures and corners interfere with the embellished areas?
- Reverse-side appearance: Is the back of an embossed or debossed panel acceptable where it will be seen?
Where packaging includes multiple components, review the finish across all relevant parts. A foil colour that looks right on a rigid box lid may appear different on a paper sleeve or label because the underlying material and surface differ.
Common approval mistakes
Do not approve a finish based only on a swatch from another paper stock. Avoid signing off an embossed logo from a flat sheet if the final design places it near a fold or on a curved, assembled component. And do not judge spot UV only under one lighting condition; its visibility depends heavily on angle and surrounding sheen.
If the product will be handled frequently in retail, fulfilment or gifting, assess the sample after realistic handling rather than immediately after production.
How to choose the right finish
Choose foil stamping when a metallic highlight is the priority and the design needs a clean, high-visibility focal point.
Choose foil embossing when the logo or hero element should feel as premium as it looks, and the artwork is bold enough for a raised finish.
Choose embossing when the packaging needs quiet texture, dimensional branding and no metallic colour.
Choose debossing when a recessed, understated mark suits the material and the board can support the intended impression.
Choose spot UV when you want flexible, selective gloss over printed graphics, especially on matte or soft-touch laminated packaging.
Before issuing final production artwork, prepare a separate finish layer, confirm the material stack, simplify any fragile details and request a representative physical sample. This approach helps ensure the selected embellishment supports the packaging design rather than becoming an expensive afterthought.
