
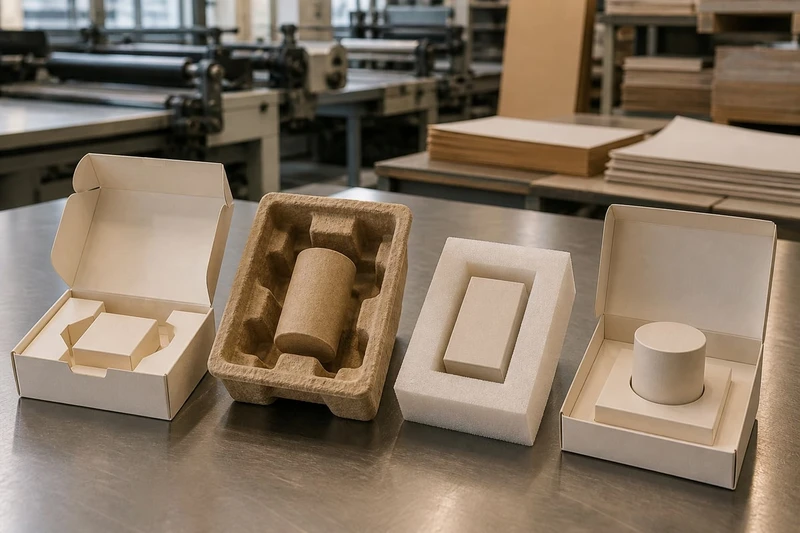
The right custom box insert holds the product securely without making unboxing difficult, adding unnecessary bulk or creating a disposal problem for the customer. Start with the product’s weight, shape and vulnerable points, then select the simplest insert material and structure that passes real packing and transit tests.
For many retail products, a die-cut paperboard insert is a practical first option. Moulded pulp can suit shaped, heavier or more protective applications, while foam is typically reserved for products needing higher cushioning or tighter protection. The best custom box insert selection balances product safety, shelf presentation, assembly time and the end-of-life experience.
Start with product weight and fragile areas
An insert should be designed around the product rather than the box alone. Before comparing materials, document what needs to be supported, restrained and protected.
Start by recording:
- Overall product weight, including accessories, cables, instructions and refill components
- Product dimensions, including any variation between units
- Fragile or high-risk areas, such as glass, screens, corners, closures, pumps, nozzles and protruding controls
- Surface finish, including coatings, metallic details, soft-touch finishes or print that may scuff
- Centre of gravity, particularly for bottles, jars, electronics and unevenly shaped goods
- Product orientation, such as upright, flat or face-forward presentation
- Transport conditions, including stacked cartons, e-commerce handling and possible movement during delivery
Weight affects more than cushioning. A heavier item can bow a thin paperboard platform, widen a die-cut aperture over time or shift inside a box with insufficient side support. A lightweight product may need very little cushioning but still require an insert to stop rattling and maintain a premium presentation.
Identify the points that need support
A common mistake is designing a cut-out that follows the product’s full outline too closely. A snug-looking profile may put pressure directly on a fragile edge, label, cap or screen. Instead, decide where the insert should make contact.
For example:
- A glass bottle is often better supported around its shoulder, base and body rather than at the cap.
- A boxed electronic item may need corner retention and clearance around buttons, screens or charging ports.
- A cosmetic jar may need base support and enough headspace to prevent the lid rubbing against the carton.
- A fragile gift set may need separate cavities so individual items cannot collide.
Also allow for normal manufacturing tolerances. If an opening is designed exactly to nominal product dimensions, some units may be too tight while others feel loose. Ask the product supplier for dimensional tolerances, and test samples from across the expected range where possible.
Compare paperboard, moulded pulp, foam and platform inserts
There is no universally best insert material. Each approach makes different trade-offs between protection, appearance, assembly and disposal.
| Insert approach | Best suited to | Protection and retention | Presentation | Assembly considerations | End-of-life considerations |
|---|---|---|---|---|---|
| Die-cut paperboard | Light to medium-weight products, gift sets, cosmetics, apparel accessories and boxed items | Good restraint when folds, tabs and apertures are correctly designed; limited shock absorption | Clean, printable and adaptable to brand colours | Can be supplied flat for efficient storage; may require folding or locking during packing | Material composition, inks, coatings and local collection rules should be checked |
| Moulded pulp | Products needing shaped support, separation or more forgiving cushioning | Good for cradling irregular forms and reducing movement; performance varies with design and density | Natural, textured appearance; less suited to highly refined printed finishes | Usually quick to place when made as a formed tray; occupies more storage volume than flat inserts | Fibre content and local recovery options should be confirmed; avoid assuming all pulp formats are accepted everywhere |
| Foam | Delicate, high-value or heavier products needing cushioning and close control | Strong cushioning potential and precise cavities; material type and thickness matter | Can look technical or premium, but may not suit every brand’s sustainability position | Often straightforward to load, especially with a single formed cavity | Disposal pathways vary widely by foam type and local services; provide clear instructions where needed |
| Platform or raised-stage insert | Products that benefit from elevation, face-forward display or layered unboxing | Retention depends on the supporting structure and any tabs, collars or secondary tray | Strong for premium gifts, launch packs and products intended to be revealed on opening | May involve more parts or manual placement than a simple tray | Often paperboard-based, but assess all layers, adhesives and finishes together |
Die-cut paperboard inserts
Paperboard inserts are versatile and can be engineered as collars, cross dividers, folded trays, cards with apertures or multi-level structures. They are often a sensible choice when the product is reasonably robust and the insert’s main job is to stop movement and organise the presentation.
They can also be printed to carry instructions, product names or a short brand message. However, printing should not interfere with critical fold lines or make packing instructions unclear.
Paperboard is less effective where the product needs substantial impact cushioning. If the item is heavy, has a narrow base, or can break when dropped, a paperboard insert may need reinforced folds, layered construction or an alternative cushioning material.
Moulded pulp inserts
Moulded pulp is useful where the product has an irregular shape or needs a cradle rather than a flat platform. It can separate components, protect corners and create a more tactile, natural look.
It is not automatically the right choice simply because it is fibre-based. A moulded pulp insert needs enough clearance to avoid abrasion, enough depth to hold the product, and enough structural strength to resist crushing under normal handling. It can also take more space in storage than a flat-packed die-cut insert.
Consider moulded pulp when the product benefits from three-dimensional support and the desired visual style suits a formed, textured surface.
Foam inserts
Foam inserts are commonly considered when product protection is the first priority. They can be cut or formed to closely surround an item, reduce movement and cushion vulnerable components.
The limitations are commercial and environmental as well as visual. Foam can increase material complexity, and disposal options depend on the specific polymer, local collection arrangements and whether it is combined with other materials. It may also conflict with a brand preference for fibre-led packaging.
If choosing foam, specify the required function rather than simply asking for “protective foam”. Confirm the foam grade, thickness, cavity design, compression behaviour, colour, odour requirements and whether contact with the product finish has been assessed.
Platform and raised-stage inserts
A platform insert lifts the product above the base of the box, often creating a reveal when the lid opens. It can be a folded paperboard stage, a rigid board structure, a tray with an elevated deck or a layered insert with a lower compartment for accessories.
This format works particularly well for gift packaging, premium retail packs and products that need a clear face-forward orientation. Explore the wider structural options available with custom gift packaging when the insert is expected to contribute heavily to the opening experience.
The risk is over-engineering. A raised stage can add parts, increase packing time and create more points of failure. Use it when elevation improves product visibility, protects accessories or communicates a genuine product benefit—not merely to make the box more complicated.
Plan fit, retention and finger access
An insert should retain the product during normal movement while allowing a customer or packer to remove it comfortably. Secure does not mean difficult to remove.
The main fit decisions are:
- Cavity clearance: Leave enough room for product variation and easy placement, but not enough for visible movement.
- Retention method: Use friction, locking tabs, a collar, side walls, a band, a lidded tray or a combination of these methods.
- Support points: Hold robust parts of the product rather than delicate corners, labels or closures.
- Removal access: Add finger notches, thumb holes, pull ribbons or a lifting edge where the item would otherwise be difficult to grasp.
- Vertical movement: Check the gap between product and lid. A product can fit tightly at the sides yet still bounce upward if there is excessive headspace.
- Accessory separation: Prevent items such as cables, pumps, chargers or samples from scratching the primary product.
Avoid common fit mistakes
A cavity may look excellent in a digital dieline but perform poorly in use. Watch for these issues:
- Apertures that pinch the product when paperboard folds are compressed
- Tabs that catch on labels, tissue or protective films
- Finger holes that expose too much of the item or weaken the insert
- A product that can rotate even when it cannot move side-to-side
- Heavy products supported by a single narrow panel
- Multiple products that touch when the box is tilted
- Cavity edges that rub against glossy, painted or soft-touch surfaces
For products with a wide range of dimensions, consider an insert with flexible retention features rather than a tightly fixed cavity. A collar, adjustable fold or shallow tray can accommodate modest variation more reliably than a highly precise cut-out.
Consider presentation and assembly
The insert is part of the customer’s first view of the product. It should make the product look intentional, aligned and easy to understand without slowing down packing unnecessarily.
For retail shelves, presentation usually depends on:
- Product orientation when the lid is opened
- Whether labels, logos or hero features are visible
- Consistent spacing around the product
- Separation between the main item and accessories
- Colour contrast between the product, insert and outer box
- Whether instructions need to be immediately visible
For e-commerce, the priority may shift towards retention, quick packing and a clear unboxing sequence. An elaborate insert that needs several manual folds can be appropriate for a limited gift set, but may be unsuitable for a high-volume fulfilment workflow.
Match the design to the packing process
Ask practical questions before approving an insert structure:
- Will the insert arrive flat or pre-formed?
- How many folds, locks or separate pieces are involved?
- Can the product be loaded from above, or must it be threaded through an opening?
- Is there a clear front and back, and can packers identify it quickly?
- Does the product need tissue, a sleeve, a bag or a protective film before it enters the insert?
- Can the assembled pack be checked visually before closing the box?
A simple insert that is loaded correctly every time is often more valuable than an impressive structure that is inconsistent in production.
The outer carton and insert should also be specified as one system. Browse custom packaging boxes with the insert dimensions in mind, including internal depth, opening style, board strength requirements and any outer shipping carton.
Review material compatibility and disposal questions
Material selection should consider the product, the packaging finishes and what the recipient can reasonably do with the pack after use.
Check product and finish compatibility
Some product surfaces are more sensitive than others. Before finalising an insert, assess whether direct contact could cause scuffing, marking, colour transfer, residue or unwanted odour.
Pay particular attention to:
- Uncoated metal, polished surfaces and soft-touch coatings
- Glass with printed labels or applied decoration
- Leather, textiles and other materials prone to compression marks
- Food, cosmetics or personal-care products, where packaging contact requirements may differ
- Products packed in humid, hot or variable conditions
- Adhesive labels that may lift when repeatedly rubbed by insert edges
If a protective sleeve, bag or tissue layer is needed, include it in the fit test. Adding it after an insert has been designed can make a previously secure cavity too tight.
Ask disposal questions early
Avoid broad claims such as “recyclable” or “eco-friendly” based solely on an insert’s base material. Coatings, laminations, foil, adhesives, magnets, foam additions and mixed-material assemblies can change the practical disposal pathway.
For an Australian customer experience, consider:
- Whether the insert can be separated easily from the box and other components
- Whether multiple materials are permanently bonded together
- Whether local kerbside acceptance may vary by council and material type
- Whether disposal instructions would help customers avoid putting unsuitable materials in recycling bins
- Whether a single-material structure can meet the protection requirement
The most suitable end-of-life outcome is product-specific. A simple uncoated paperboard insert may support straightforward disposal in many circumstances, but this should still be confirmed against the final material specification and relevant local guidance. A more complex insert may be justified if it prevents product damage; the decision should be made transparently rather than through assumptions.
Approve the insert through fit testing
An insert is not ready for production when the artwork and dieline are approved. It needs physical testing with actual—or highly representative—products and all packing components in place.
A useful approval process includes the following steps.
- Build a representative sample
Test the intended box, insert, product, accessories, tissue, sleeves, labels and any seals together. Dimensions on paper cannot reveal every interference point.
- Check loading and removal
Confirm that a packer can insert the product without excessive force and that a customer can remove it without damaging the item or the box.
- Assess alignment and appearance
Open several assembled packs. The product should sit consistently, face the intended direction and avoid visible gaps or crushed panels.
- Test normal handling
Inspect for movement when the closed pack is tilted, inverted and gently shaken. Check whether components collide, the product escapes its retention features or the insert deforms.
- Review stacking and transit risk
Where relevant, test the retail box within its intended shipping configuration. A retail insert may perform well alone but not when outer-carton compression or parcel handling is introduced.
- Use product variation samples
Test small, large and typical units if dimensions vary between batches. This is especially important for handmade goods, filled containers and products sourced from more than one manufacturer.
- Record changes before final approval
Note cavity dimensions, board grade, fold direction, retention changes and packing sequence. Small structural changes can affect performance significantly.
A practical approval checklist
Before signing off, confirm that the insert:
- Holds every component in the intended position
- Protects fragile areas without applying damaging pressure
- Allows reasonable product removal
- Works with all protective wraps and accessories
- Fits the selected box at the correct internal depth
- Maintains presentation after handling
- Can be assembled at the expected packing speed
- Uses materials and finishes that suit the product
- Has considered separation and disposal at end of use
- Has been assessed using real physical samples
Frequently asked questions
What is the best insert for a custom box?
The best insert depends on the product. Die-cut paperboard is often suitable for lighter products and gift sets; moulded pulp suits shaped cradling and separation; foam may be appropriate where cushioning is critical; and platform inserts work well when elevated presentation matters. Test the final choice with the product, not just a dimensional drawing.
How tight should a box insert be?
It should be tight enough to prevent noticeable movement but loose enough for easy loading and removal. The correct clearance depends on product tolerances, surface sensitivity, any protective wrap and the retention method. Avoid relying on friction alone for heavy or fragile products.
Do I need a finger notch in an insert?
A finger notch is useful when the product sits below the top edge of the insert or cannot be safely lifted from another point. However, it should not weaken the structure or expose the product to movement. A pull ribbon, lifting tab or shallow tray may be a better option in some designs.
Can one insert hold multiple products?
Yes, provided each item has its own secure space and cannot collide with the others. Consider different product weights, removal order, accessory placement and whether the whole set remains balanced when the box is carried or opened.
A strong custom box insert selection starts with the product’s real handling risks, then proves the design through samples and fit testing. If you are developing a new pack, prepare a product dimension sheet, component list and a few representative units before requesting an insert concept from XGolden Print or another packaging supplier.
